29th “thing” achieved: 37. Do a West Coast Swing or Lindyhop Workshop

A new style of dance under my belt!

Over the last 20 years, I have learnt many styles and forms of dance, from Ballroom, Argentine Tango, Modern Jive, to dabbling in Salsa, West Coast Swing and even had a go at Belly Dancing.

One form of dance I never got round to learning was Lindyhop. It originated in America as a form of jazz/swing dance. It looks like fun – bouncy, exuberant, playful – and I have had it in the back of my mind for a while to learn. Very occasionally at a dance event I see someone doing Lindy, and I thought it would be fun if I could join in, at least a little.

e9e5d4f564276c0b_large1
Looks like fun! (picture source: http://www.ridleymcintyre.com)

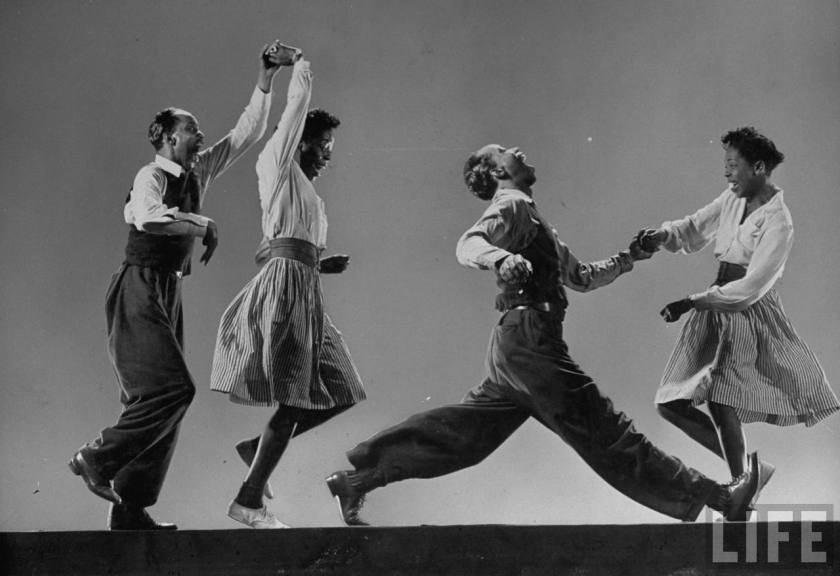
I love the music, and I love the “look” – kind of jazzy, think vintage 1920’s, 30’s and 40’s. Guys in braces, flat caps, high waisted wide-leg trousers and two-tone shoes; women in dresses that are fitted up top and flare out when you spin. Definitely my cup of tea!

lindyhopsecond
Lindy style (picture source: http://cam3297.cias.rit.edu/projectone/lindyhop.html)

A friend of mine recommended a local class that meets on a Monday in Guildford, however I was really looking for a quick, intensive course to get a basic understanding of the dance. A bit of research and I found a workshop (full or half day) run by Swingland in London.

The day dawned and I headed on over to Balham where the class was to be held. There was no-one there! After wandering into an empty bar, I discovered that the class had been cancelled.  I contacted the organisers who were really apologetic, somehow my email was rejecting their messages so I didn’t get the emails about the fact it had been rescheduled.

20170729_113950
Sad face as I arrived to find a cancelled class 😦

Apology accepted, I booked myself onto the next available course. This time when I arrived the teachers and other attendees were all there, which was a good start!  One thing I loved was that the instructors requested that you shouldn’t give tips or feedback to your partner but allow the teacher to do so. This meant that people could get stuck in without fear of criticism from their partner.

Lindyhop is a partner dance, closely related to Jive and Charleston. We partnered up and swapped around so everyone got a chance to dance with everyone else.

We began by learning the rhythm and footwork, I found this bit OK but I have a tendency to use my hips and close my feet – both pretty big no-no’s in Lindyhop. The posture is also unusual – almost leaning forward with your bum out – and I kept having to correct myself!  We learnt various steps and soon had a little routine to dance through.

The other people on the course were a mixed bag of abilities. Some beginners who had never danced before found it really difficult to get the hang of the rhythm, whereas others seemed pretty experienced and breezed through the morning session.

During the lunch break, I chatted to a few of the others. The general feeling was that everyone was finding the new dance style challenging, but a few people complimented me on my style and asked me if I had done it before! In the meantime I was thinking the same thing about them. It seems we truly are our own critics, something I’ve noticed before.

The second half of the day we learnt some more complex moves, including a beginner’s version of the classic “throw out”, and some charleston-style jumpy kicky stuff. Sadly it was a bit too challenging for some, who dropped out, but we were joined by some more people who were “improvers”, so the class was a little fuller (albeit mostly followers so we had several ladies standing out in between rotations).

I had a really great time and definitely enjoyed myself. I am pleased I’ve finally got a new dance under my belt, and I am sure with a little more work I could become fairly competent at it.  My only (slight) criticism is that I would have liked more dancing to the music and less talking/walking through. But that might just be my impatient personality – I just wanted to get stuck in!

However for me, whilst watching advanced dancers is truly fantastic, I am afraid that with less experienced dancers it looks to me a little bit like someone’s had an underwear accident. I am sure it feels great but I do prefer dances where there is a little more elegance and grace.

It’s just my opinion though, so I would still thoroughly recommend that you give it a go. I can especially recommend Martin and Romayne from Swingland who were absolutely brilliant. The class was fun, well taught, and the right balance between challenging and achievable.

For more information:

22nd “thing” achieved: 19. Learn Sign Language

I now know more signs than just the rude ones!

There are almost a million people in the UK with severe/profound deafness. If we included age-related hearing loss, this rises to over 11 million! That is one in 6 of the UK population!

When I was a kid, there was an old lady at my church who was deaf and blind. Her husband used to sit beside her in the services and translate the sermons using a version of the BSL (British Sign Language) alphabet which is drawn onto the other person’s hand. My brother, sister and I all learnt it so that we could communicate with Elsie, and I can still remember it to this day, but never really used the skill again after she passed away.

I have often watched the late night shows with the little translator in the corner, especially in my Student days, and I always fancied giving sign language a go. The Deaf/Blind alphabet is all very well, but I never met anyone else that was deaf/blind and the alphabet, whilst similar, is different enough that it doesn’t quite translate to BSL. So I popped it on the list and started to research courses.

BBC-Breakfast-News-British-Sign-Language-news
Typical late night telly with sign language

As the skill can be considered a transferable skill I asked my employer if they would be willing to assist in funding the course. I wrote a justification as to how I thought it could enhance our company’s offering and was delighted to learn that the company would make a contribution towards the cost.

I began my research by looking into an Adult Learning evening course. There was one at Surrey Uni for £252, but they were one term in to a year’s course and they felt it would be a big jump to catch up. I then found a private company (Dot Sign Language)  who offered a 20 week course in BSL Level 1 for £350 (plus assessment fees). Unfortunately I missed the sign up deadline, and the next term didn’t start until October, so I enquired about private tuition instead.

bsl

Amazingly, the Director, Kathleen Grehan, was more than happy to offer one-to-one sessions at a cost of just £30 an hour. She even agreed to meet me at my workplace during my lunchbreak, so that I could fit it into my working day!  We agreed a 10 week course, and we would take a view as to whether I would be able to complete a qualification or not, depending on how quickly I picked it up.

When arranging to meet, I discovered that Kathleen is deaf and that we would be communicating by pad/paper or typing onto a laptop; or sign language. I was a little nervous before we met, but luckily Kathleen was absolutely fantastic; very friendly and non-intimidating.

Our learning objectives were:

  • Understand and communicate basic conversations when meeting Deaf people
  • Know basic numbers
  • Know different weather conditions
  • Know range of transport modes
  • Communication a range of directions

BDA_BSL_Fingerspelling_card

I spent my first lesson learning greetings, the alphabet, how to offer tea and coffee, basic numbers, and number contexts such as time, money, age, 1st, 2nd, 3rd etc., and questions such as who, what, where, why, how.  Kathleen followed up after each session by emailing me with a copy of the notes from our session along with a video clip so that I could practice.

The rest of the 10 sessions went as follows:

  • Week 2 – We discussed the news, election, political parties, colours, numbers
  • Week 3 – Days of the week, today, tomorrow etc, and general weather topics such as sun, rain, cloud, hot, cold etc. We then moved on to directions, and different types of transport.
  • Week 4 – We practised, as I had my first assessment the following week!
  • Week 5 – First Assessment
  • Week 6 – Family, background, home, describing people, ages, jobs
  • Week 7 – Hobbies, dancing, holidays and my 40 things.
  • Week 8 – Second Assessment
  • Week 9 – Job role, insurance, directions,
  • Week 10 – Final Assessment.

The assessments took place by setting up a video camera and then having a conversation around a set topic. Kathleen then sent off the videos for external verification.

A few weeks later, I received confirmation that I had passed! Whilst not the greatest mark, I achieved 60% so I was fairly OK with that – had to remind myself that’s a 2:1 in degree terms!

The certificate arrived today and I have promised myself that I will keep practising and I hope to tackle level 2 at some point!

20170907_180200
Got my certificate! #proudface

I really enjoyed learning BSL, and it is such a great skill to have. There are so many people who can be isolated from the hearing world and I am keen to do my part in including them. Anyone can learn, and it doesn’t have to be a classroom environment.  You could probably get a few of you together and share the cost too!

For more information:

13th “thing” achieved: 27. Learn dressmaking/alterations

I can sew!

Since ditching Home Economics at the earliest opportunity, I forgot about sewing until my late 20’s when I suddenly discovered a talent for making fancy dress costumes.

My technique consists of “have a guess and hope it’s OK” but I wanted to learn some fundamental skills. In particular, how to follow a pattern, and how to alter clothes so that they fit me properly.

I undertook a search online and found Alex who teaches all sorts of sewing skills, and arranged a series of classes. She charged us £40 for two hours for up to 4 people. Due to other commitments, we were only able to get a group of 3 together – me, Natalie and Jo.

We decided we wanted to learn the following:

  • Making clothes from a pattern
  • Altering trousers (hems – mostly for Nat and Jo)
  • Altering dresses (particularly nipping in at the waist and keeping room up top)

Alterations are a big deal for me. Every part of me is a different size so if I fit my top, clothes hang off me round the middle; if I fit my waist, the cloth bulges and stretches horribly around my bum, and so on. I bought a dress once which I paid to have altered and it was amazing. But I can’t afford to shell out £40 extra every time I get a new outfit! Alternatively, I can shop in Pepperberry which caters to curvy ladies, but they are fairly expensive and it does limit my choice somewhat.

We arranged to hold four sessions at Nat’s house, as she has a nice big table and lots of space. The first week we covered taking up trousers and repairing hems invisibly. No more WonderWeb for me!  We learned about different types of material, thread, machines, needles, pins and much more – Alex was a fount of information!

20170401_171241
Week 1: Intro to sewing, and how to hem trousers

The second week I learned the proper way to repair a skirt that I ripped (I walked about with a super high split up my skirt all day due to an extra large step on the train). Nat began work on a dress pattern, whilst Jo started to make some shorts for her children from an old dress.

20170415_161901
Week 2: Nat’s shuffling pattern pieces, I’m repairing my dress whilst Jo cuts out the shorts

The third week I learned that the reason some of my dresses appear too big is because they are too long in the back, causing the material to bunch up. The dress I worked on had to lose about an inch in the shoulder, I shifted it all up a bit and sewed the sleeve back in. When finished, the dress fitted perfectly!

The final week I learned the bit I really wanted to know – how to make dresses more shapely around my curves. I’d picked up 2 good quality dresses from a charity shop for £4.50 each (per una and Coast) that fit my largest measurement but were loose everywhere else. Alex showed me how to pin, mark and create darts to make the clothes fit.

I managed to sort one, whilst the other now needs some material taking out of the back (like the previous week’s project). It’s a bit more tricky as there’s no room at the shoulder so I’ll have to take it down into the waistband, fiddly with an invisible zip. That one’s still a work in progress, but the other looks great and I’ve already had people comment on how nice it is!

Overall, I think I’ve made a really good start on the sewing. To truly grasp the nuances of the art would take many years but I feel I have enough skill to do what I set out to do – alter my own clothes to fit and repair those annoying little niggles.

All 3 of us have agreed that we have learned some useful skills and want to have more lessons. However we have other commitments (I have a lot on in the next 3 months!) so this may be something I come back to after my birthday.

I’ve got a pattern that I’m working on, I’ll be having a go on my own and then if/when I get stuck I’ll be calling Alex for some more lessons!

Alex teaches at Surrey Adult Learning, or you can book private lessons here.

It’s something I think we can all benefit from and Alex is the perfect teacher to get you on the right track!


*BONUS* “thing” achieved: Do a Life Drawing class

I’m an artist now!

Drawing has never been a strong suit of mine; at school I opted for Pottery rather than drawing or painting. I’ve ever quite got the hang of translating what my eye sees, and my brain wants to convey, onto paper.

Last week I met a girl at a Flashmob, Helen, who was doing 30 things for her 30th, and completing a Life Drawing class was one of her goals. When her friend dropped out at the last minute, I jumped at the chance to try something new and expand my artistic horizons!

We turned up at a funky pub in Balham where they run Life Drawing classes each month. Dan, the chap who ran the sessions, is an accomplished artist with bags of enthusiasm and a great sense of fun.  We were greeted by a table of different materials – felt tips, charcoal, crayons, chalk etc; I was like a kid in a sweet shop when I grabbed a handful of everything “just in case”!

20170601_105455
All the materials!

I didn’t have any expectations but was still surprised and slightly relieved at the format. Rather than lots of arty types staring seriously at a model for hours, it was a light, fun atmosphere with many of the other attendees swigging their wine and excitedly wielding their materials ready to start.

We began with a 7 minute pose, where the beautiful model arranged herself aesthetically and we all attempted to draw what we saw. Dan explained that they usually alternate between male and female models and they play with different styles and concepts – next time they will have a dancer to explore movement, other times light and shadow, other times look at cubist art etc.

20170531_233800
First pose

Dan then tried to get us to throw away our previous learned behaviours. We did another pose, 5 minutes this time, trying different materials. I used a really light pastel which you can’t really see in the photo so I’ve not posted them. We then had another pose where we were challenged to use our non-dominant hand! That was a bit harder but I had a good go at it!

Next we were challenged to focus on what we saw – so we had 3 minutes to draw without looking at the paper at all. I was pleasantly surprised that my picture came out looking even vaguely like a person!  Then we experimented with trying to express the stress and strain of an uncomfortable looking pose.

20170601_105625
Left: Drawn without looking at paper. Right: Stress and strain

Next we had a quick-fire session where we had 3 poses, a minute each, and we had to draw each on top of the other in one continuous line (without lifting the pencil from the paper). We then worked on how to accept mistakes and refine, by drawing and correcting over the top. I chose to do each layer of correction in a different colour so I could see how the picture evolved.

20170601_105649
Left: 3 quick fire poses, one continuous line. Right: Refining mistakes

We also looked at how to simplify images, so tried drawing using only geometric shapes; and finally tried experimenting with light and shadow.

20170601_105724
Left: Geometry. Right: Light and shadow.

We then did something completely different – with a blank sheet of paper and no materials, we were challenged to create something that represented the next pose. I was pretty proud of my little paper lady!

20170531_202932
Paper lady

Phew! After all that, and a short break, we finished the evening by playing with different media (this month was Collage!) so I had great fun cutting, ripping and sticking.  Funnily enough I was looking at everyone else’s efforts and admiring their results whilst being disappointed in my own, only to have a couple of people look at mine and say “oh that’s really good, wish I could do that!” so I guess we are truly our own worst critics!

20170531_213536
Collage

I already had 40 things on my list but one of them is proving to be difficult to arrange (who knew stalking a celeb would be so hard?!) so I am pleased to add this achievement to the list as a late addition, and hopefully keep my total achievements at the magic number of 40.

If you want to give this a go, I would strongly recommend it. I’ll probably even go with you!

Contact details below.

The Exhibit: http://theexhibit.co.uk/life-drawing/
Dan: http://www.danwhiteson.com/life-drawing/

10th “thing” achieved: 20. Learn to do 40’s hair

Vintage hair skills

I’ve always loved vintage style, and in particular I love the elegant hairstyles of the 1940’s with the Victory rolls and flawless looks.

I’ve had a vintage makeover before and loved it, but never managed to replicate the look for myself.  Natalie and I met Lucy at a Vintage fair last year and hired her to do our hair for a friend’s wedding, so when we decided to learn how to do it ourselves, she was our first choice.

Lucy offered us the choice of going to her place, or coming to us – we chose for her to come to us, and met on a Saturday morning. She supplied all of the equipment, although she also brought a shopping list so that we could go buy they stuff for ourselves afterwards. She demo’d it on a model head first, it took about 10 minutes and looked really easy so I thought this one would be a cinch!

20170529_145831
Lucy made it look easy

We started by curling one side of our hair in sections, then backcombing it. We thought we looked like the Who’s out of The Grinch!

20170529_145931
Part one – crazy hair stage

We then smoothed out the outside, and twisted into a roll. This was my absolute nemesis and I ended up getting quite emotional when I couldn’t do it! It turns out my brain is not able to reverse the images I see in a mirror so I kept twisting the hair the wrong way and I got more and more frustrated.

In the end I had to abandon it and start again on the other side, which was much better, then go back to the original side to make a second roll.   I finally managed to do something, it was quite messy but kind of in the right shape.

20170529_150311
Part two – the finished articles! All thanks to Lucy (ignore my slightly swollen post-tears eyes)

I went out and bought all the gear and then a few days later I had another go. It actually turned out alright!

20170529_150541
The finished article, quite proud!

Still need some practice, and when Natalie and I go to the Nostalgia festival next week we won’t have the luxury of curling tongs – but overall I feel like I might be able to pull it off without shaming myself!

I’d definitely recommend that if you fancy this, give Lucy a shout. She is absolutely brilliant, patient and encouraging, and she really knows her stuff. Or if you just want the ‘do without the hassle, get Lucy to do it for you, she is a hair genius!

Lucy’s contact details:
Website: Hair that Turns Heads

5th “thing” achieved: 9. Learn Calligraphy

I can write fancy now

I’ve always admired beautiful writing, and when I was about 12 someone gave me a little framed picture with a bible verse on it. The writing was lovely and it inspired me to try calligraphy. Of course what I actually did was get a slanty pen and write neatly. But the seed was sown: it’s been on my list of things to learn for ages.

Finally I did something about it. I searched for local courses and found a lady called Judy Broad  who ran courses and signed myself up.

I arrived at a lovely venue and settled in to what looked like a little shed, but was perfectly decked out inside, and thus began our writing adventure. Joining me were a few graphic designers wanting to expand their repertoire, a lady who got it for a 70th birthday gift with her daughter, a bride to be who wanted to save money on her wedding stationery, a couple who recently married and discovered a love for typography whilst writing their own signs etc, and two friends who were on a mission to experience as many “adventures” as possible.

20170204_163549
Our workshop was in that little shed

We began by setting up our pens and ink (kindly supplied) and practicing basic pen strokes. Who knew straight lines and ovals could cause so much trouble?

20170204_134808
My writing supplies

We then went on to practice the alphabet and finally actually write some words. After a break for coffee and cake Judy showed us some examples of flourishing, and of course we all gasped in admiration as she effortlessly wrote and embellished her words beautifully.

After a couple of hours of intense concentration, I finally managed to come up with some acceptable work.

20170204_163020
My random scribblings

Judy was so helpful and her open relaxed style really created a great atmosphere, and our little group were friendly, with everyone encouraging and complimenting each other. When one of the guys suggested holding my pen further away from the nib, it helped no end!

Overall a lovely afternoon and I feel like I have gained a skill. I still have more to learn and I will definitely be taking another class in the future!

To find out more about Judy’s workshops, visit her website here.